
Want to manage thousands of photos on your iPhone and get your gallery organized? A cluttered photo library can slow down your device and make it harder to find the images you need. To help you, we’ve prepared a guide consisting of two steps: first, remove duplicates and other unnecessary files, and then organize your iPhone photos into custom albums.
Step 1: Declutter iPhone Photos Before You Organize Them
Before you start organizing your photos on iOS into a convenient structure, it’s best to remove any unnecessary ones first. This reduces the number of images you need to sort, which makes the process faster and guarantees you don’t keep any extra clutter. In the following sections, we’ll highlight key areas to concentrate on when deleting photos so you won’t have to sift through your entire gallery.
Remove Duplicate Images
To organize your photos without duplicates, the first step is to delete them, right? Not only do they take up extra storage space, but they can also make organizing your photos more difficult. For example, you might add a photo to an album, only to later find another identical one. To avoid this, check the Duplicates album, where similar images are automatically grouped. From there, you can quickly delete extra copies and keep just one.
- Open the Photos app, navigate to the “Utilities” tab, and tap on “Duplicates.” This album automatically groups identical photos.
- Tap on the “Select” option at the top right of the screen to start selecting the duplicates you want to manage.
- You can then tap “Select All” to select all duplicate groups. At the bottom of the screen, tap the “Merge” option to keep the best version and delete the rest.
- After selecting, iOS will prompt you to confirm your action. This ensures you do not accidentally delete any photos you might want to review individually. Confirm the merge to proceed and delete duplicate images.
- To free up space immediately, go to the “Recently Deleted” album, select all items, and delete them permanently.

One thing to keep in mind is that this function only detects exact duplicates—photos that are 100% identical. However, your iPhone likely has many similar images that aren’t exact matches. So, how do you handle those? To remove near-duplicates, you’ll need a third-party cleaner app for iPhone. Many of these apps use advanced AI algorithms to identify and group similar images, making it easy to decide which ones to keep and which to delete.
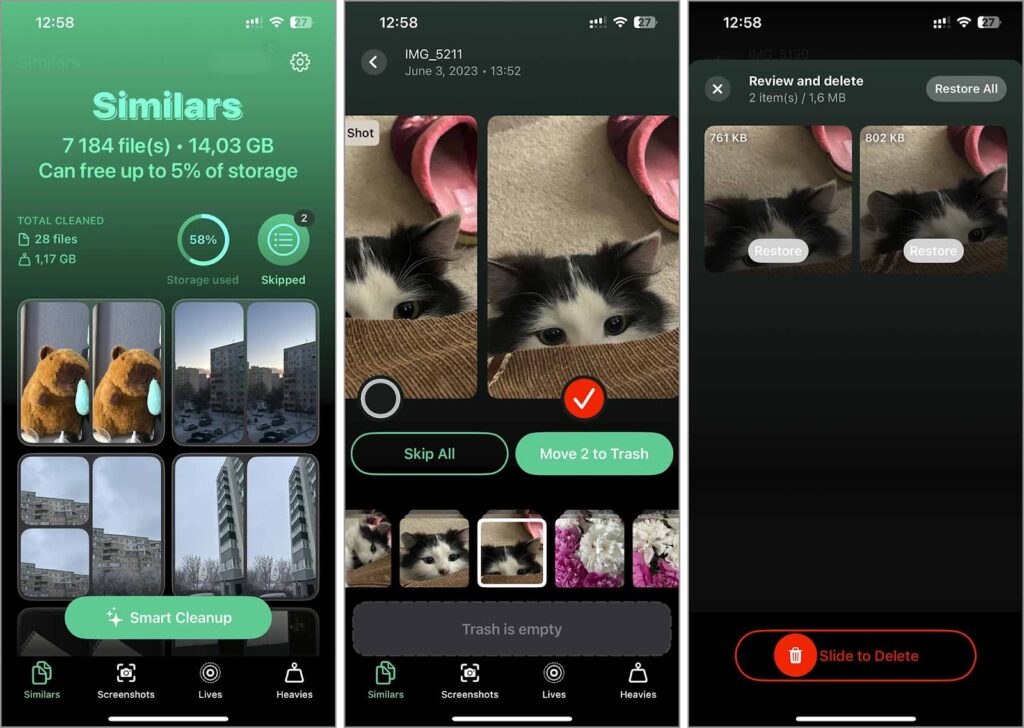
To show how these apps work, we chose the Clever Cleaner app for iPhone. It neatly organizes similar photos from your gallery, automatically picks the best one, and marks the rest for deletion. But if you don’t agree with its choices, you can adjust them manually. The app also lets you delete all your screenshots, remove Live Photos while keeping their still versions, and clear out large media files (usually videos). Best of all, Clever Cleaner is completely free with no paywalls.
- Install Clever Cleaner from the App Store onto your iPhone.
- Launch Clever Cleaner and grant it access to your Photos app to scan for similar images.
- The app displays groups of similar photos. If you agree with its selections, you can use the “Smart Cleanup” feature to automatically remove unwanted images.
- If the app selects a photo you prefer to keep, adjust the selection manually. Tap on the group, deselect any photos you want to keep, and select those you wish to delete.
- Move the selected photos to the app’s trash. Review them once more in the trash to confirm no important photo is deleted by mistake.
- Finally, move ‘Slide to Delete’ to delete to remove the photos from your Photos app. They will then move to the ‘Recently Deleted’ album in your Photos app, where you can clear them to free up space.
Delete Old Pictures That Are No Longer Needed
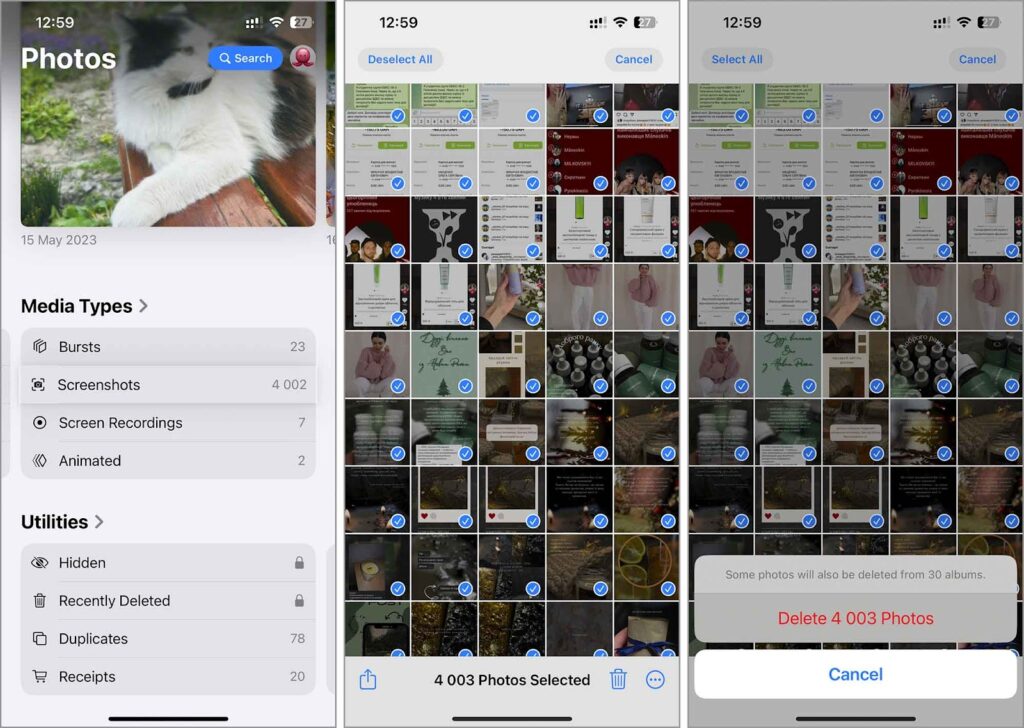
If your photo gallery has thousands of images, there’s probably a lot you no longer need or have forgotten about, and you should delete them. Instead of scrolling through every photo, use the Photos app’s categorization features. It sorts images into types—screenshots, bursts, portraits, selfies, and panoramas—so you can quickly target and delete the ones you don’t want.
- Launch the Photos app on your iPhone.
- Find the “Media Types” tab at the bottom of the screen to view the different categories of photos stored on your device.
- Look for albums that categorize photos by type, such as “Screenshots,” “Selfies,” “Portraits,” and “Bursts.” These albums automatically group similar types of photos together.
- Open each category and review the photos. For many users, screenshots or bursts contain numerous unnecessary images that were saved unintentionally. Select these images and tap the trash icon to delete them.
- After deleting unnecessary photos, open the “Recently Deleted” album under Utilities and permanently remove them from your iPhone. This step instantly frees up storage space.
Step 2: Organize Pictures on iPhone
Now that your gallery only has the photos you really need, it’s time to organize them into a system that works for you. The Photos app offers a variety of features—like favorites and hidden albums—but we’ll concentrate on the most useful ones to make your gallery easy to navigate in the future.
Add Location Tags to Your Photos
Your Photos app includes a “Map” feature that automatically groups photos taken in the same city. However, sometimes, not all images are sorted correctly—this might happen if location services were turned off when you snapped the picture or if the geodata is off. In these cases, you can manually add a location to a photo. This lets you sort all your photos on your iPhone by where they were taken, which is handy if you travel frequently or take business trips to different cities and countries.
- Open the Photos app on your iPhone.
- Browse your photo library and choose the photo you wish to tag with a location.
- Swipe up on the photo, and in the info panel, tap “Add Location” if no location data is present, or tap on the existing location to edit it. You can then search for and select the appropriate area from the map.
- To check if the photo appears in the correct location album, go to the “Utilities” tab, scroll to “Map,” and verify that your photo is listed under the correct city or country.

Organize Your Photos into Albums and Folders
If grouping photos by location doesn’t work for you, another option is to create custom albums. This lets you organize your photo library the way you want—whether that’s by person, object, event, or anything else. We’ll show you how to create an album, and then you can decide which photos to add.
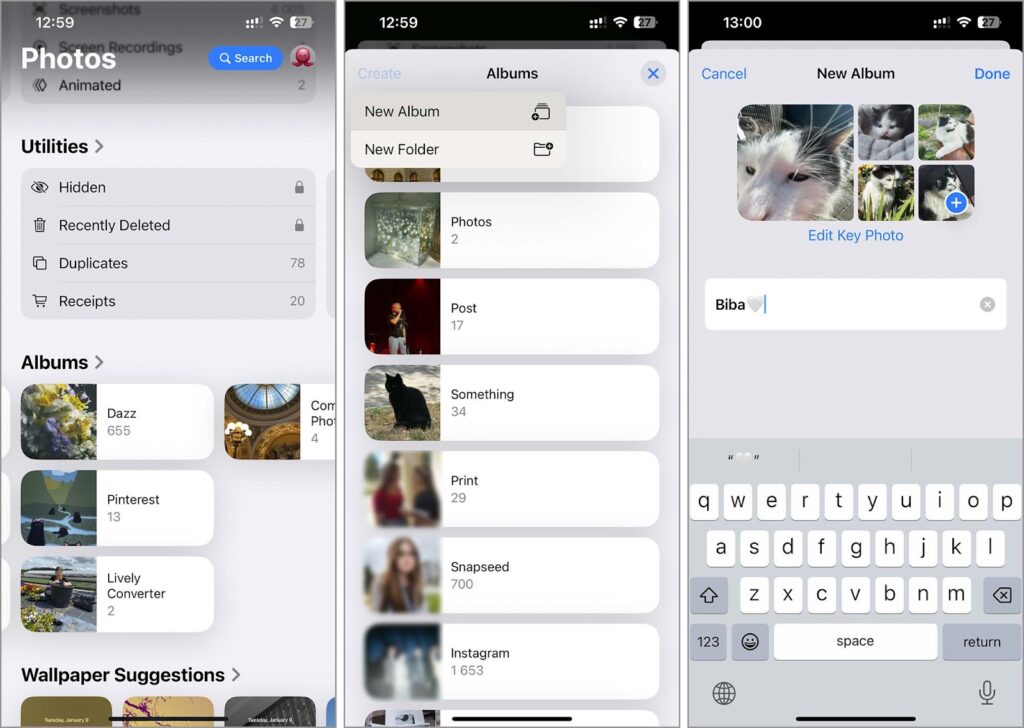
- Access the Photos app on your iPhone.
- Scroll to the ‘Albums’ tab at the bottom of the screen, where all your current albums are displayed.
- Tap the ‘Create’ button at the top left of the screen and select ‘New Album.’
- Provide a name for the album that reflects the theme or the type of photos it will contain.
- Browse your library, select the photos you wish to add, and then tap ‘Add’ to include them in the album.
- After naming your album and selecting the photos, tap ‘Done’ to complete the process.
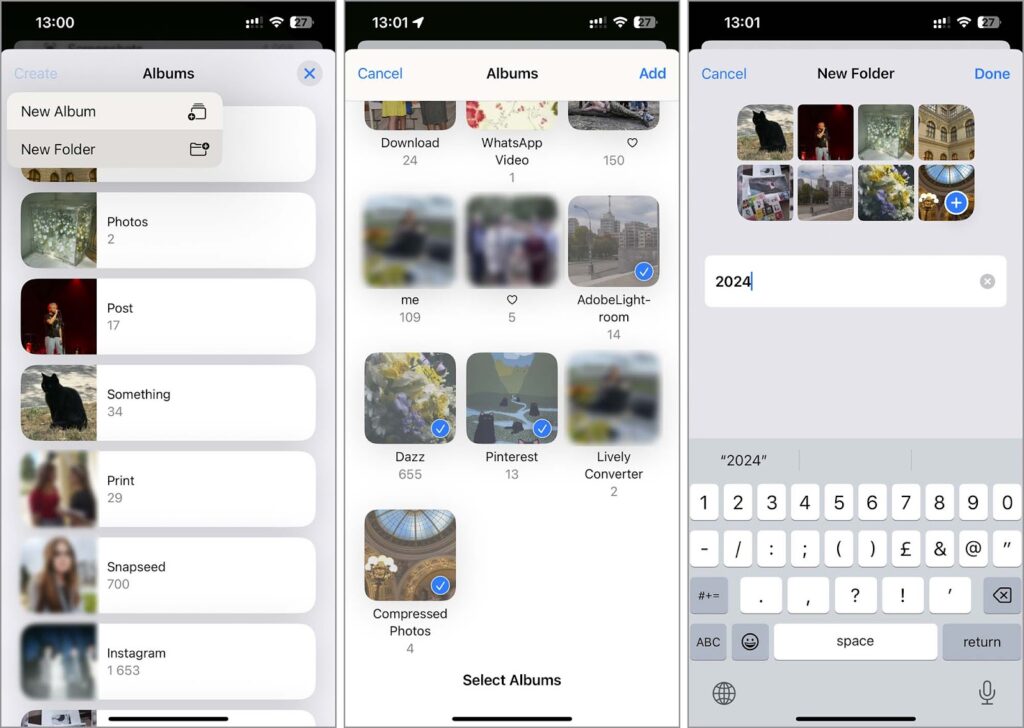
If you end up creating a lot of albums, don’t worry—you can further organize them by creating folders. This lets you structure your photo library even more efficiently. For example, you could make an “Animals” folder to hold separate pet albums, or a “Year” folder to group event albums by year. The process is pretty similar to creating an album.
- Open the Photos app on your iPhone and navigate to the ‘Albums’ tab again.
- Tap the ‘Create’ button at the top left of the Albums tab, and select ‘New Folder’ instead of ‘New Album.’
- Type a name for your folder that suits your needs.
- Select the albums you wish to include in this new folder and confirm the addition.
- Once you’ve organized your albums into the new folder, tap ‘Done’ to finalize the structure.
That’s it! Your photo app is now organized exactly how you want it. This not only makes your library look better but also improves functionality, making it easier to find your images.
Final Thought
Now you know how to organize your Photos app without duplicates and arrange it exactly how you want. While iPhone cleaner apps can quickly remove clutter, setting up a structured photo library still requires some manual effort. To achieve the best results, you’ll need to invest a bit of time.
Once your photos are organized, try to maintain them regularly. If you prefer tagging photos with locations, add them right away. If you find it easier to keep everything sorted in albums and folders, add new photos there as you go. This way, you’ll avoid having to reorganize everything again later.